
How to Set Up Artwork for Plastic Card Printing
Getting a plastic card printed is straightforward. Getting the artwork right — so it actually looks like you intended — is where most people trip up.
This guide covers everything you need to know before you send your files: bleed, resolution, colour mode and safe zones. Follow it and you will avoid the most common reasons artwork comes back for correction, or worse, prints wrong.
We have been supplying plastic cards since 1992, so when we say we have seen these mistakes before, we mean it.
The Four Things That Matter
Get these four right and the rest of the file will look after itself.
1Bleed — Don’t Skip It
Plastic cards are printed on large sheets, then cut down to CR80 size — 86mm × 54mm, the same as a standard bank card. Cutting is not pixel-perfect: there is a small amount of natural movement, typically around 1–2mm. If your artwork has no bleed, you will get a white or unintended coloured border along one or more edges.
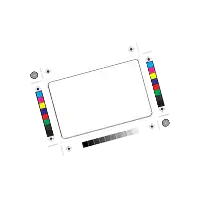
- Artwork document — 92 × 60mm. The file you send us: the card plus 3mm of bleed on every side. The shaded band is trimmed off and never appears on the finished card.
- Finished card — 86 × 54mm. Where the cutter lands, give or take the 1–2mm of movement that makes the bleed necessary in the first place.
- Safe zone — 80 × 48mm. 3mm inside the card edge. Keep all text, logos and barcodes within this line.
Here is what to do:
- Add 3mm bleed on all four sides, so your artwork file is set up at 92mm × 60mm.
- Extend your background colour or design elements right to the edge of the bleed area — not just to the card edge.
- Bleed is not visible on the finished card. It is insurance against the cutter, nothing more.
Common mistake Designing to exact card size (86 × 54mm) with no bleed, then wondering why there is a white line along the edge of the finished card.
2Resolution — 600dpi Minimum
Screen resolution and print resolution are not the same thing. A design that looks sharp on your monitor at 72dpi will print blurry. Set your document resolution to 600dpi (dots per inch) at the final print size.
What that means in practice:
- If you are working in pixels, a 92 × 60mm document at 600dpi is 2173 × 1417px. That is the floor for a full-bleed card, not a target to aim under.
- If you are using vector software (Illustrator, Inkscape), resolution is less of a concern — vector artwork stays sharp at any size. Just make sure any raster or photographic elements embedded in the design are also 600dpi. There is more on the difference on our raster versus vector page.
- To check: in Photoshop, go to Image > Image Size and look at the resolution figure. In Illustrator, check the resolution of any embedded raster images via the Links panel.
Never do this Scaling up a low-res image to make it fit. Taking a 72dpi screen-grab to 600dpi does not add detail — it just makes a blurry image bigger. There is a worked comparison on our resolution example page.
3Colour Mode — CMYK, Not RGB
Screens display colour using RGB (red, green and blue light). Printing uses CMYK (cyan, magenta, yellow and black ink). They are different colour systems, and colours can shift when converted. Set your document to CMYK before you design, not as an afterthought.
- Convert to CMYK early. If you design in RGB and convert at the end, bright colours — especially vivid blues, greens and oranges — can shift significantly.
- Black: set every black to C0% M0% Y0% K100%. Black converted from RGB is made from all four inks (C75% M68% Y67% K90%) — muddy brown across a large area, blurred at the edges on small text.
- Spot colours: we print in CMYK and do not print or match to Pantone colours, so give brand colours as CMYK values. A Pantone reference is converted to the nearest CMYK equivalent. If a colour has to be right, order a postal proof. Our page on Pantone colours explains why.
If you only have an RGB file we can convert it — but be aware the colours may not match your screen exactly. Our pages on CMYK printing and CMYK versus RGB go into more detail.
4Safe Zone — Keep Content Away From the Edge
Bleed handles the outside edge. The safe zone handles the inside. Keep all text, logos and anything critical at least 3mm inside the finished card edge.
The same cutting tolerances that require bleed on the outside mean content too close to the edge risks being cropped. A phone number or a logo edge sitting 1mm from the card edge is a risk, not a design choice. In practical terms:
- Your finished card is 86 × 54mm.
- Your artwork with bleed is 92 × 60mm.
- Your safe zone is 80 × 48mm, centred within the finished card.
Most design templates, ours included, show this inner boundary. Stay inside it — you can download ours from the artwork guides page.
Before You Send the File
What to save it as, and a last run through everything above.
File Formats We Accept
- PDF — preferred. Embed all fonts and flatten transparencies.
- AI — Adobe Illustrator. Outline all fonts.
- EPS
- PSD — Photoshop. 600dpi, CMYK, flattened or with layers clearly labelled.
- TIFF — 600dpi, CMYK.
We do not accept Word files, PowerPoint, or low-resolution JPEGs exported from Canva. If that is what you have, we can still help — but expect a conversation before we can print. There is more on what file format to send.
Summary Checklist
Before you send your artwork, tick these off:
- Document size: 92mm × 60mm — card size plus 3mm bleed all round.
- Resolution: 600dpi minimum at final print size.
- Colour mode: CMYK.
- Background and design extend to the bleed edge.
- All text, logos and critical content inside the 3mm safe zone.
- Fonts embedded or outlined.
- File format: PDF, AI, EPS, PSD or TIFF.
Not Sure About Your File?
Send your artwork over when you place your order and we will check it before it goes to print. If there is a problem we will tell you exactly what needs fixing — we do not just reject files without explanation.
Our cards are printed in England, we check every order manually, and we will not put artwork to press if something looks wrong. If you would rather have it looked at before you order, that is what our artwork checking service is for.
Rather not set it up yourself? Our in-house design team will build the file for you from your logo, your wording, or a rough idea. Find out more about our design service.
Questions & Answers
-
What size should my artwork be for plastic card printing?
92mm × 60mm — the standard CR80 card size (86mm × 54mm) plus 3mm bleed on all four sides. See CR80 card size for the finished dimensions. -
What resolution should plastic card artwork be?
600dpi at the final print size. For a 92mm × 60mm document with bleed included, that is a minimum of 2173 × 1417 pixels in raster terms. Vector artwork (AI, EPS) has no resolution limit — see raster versus vector. -
Should plastic card artwork be CMYK or RGB?
CMYK. Set your document to CMYK before you start designing. Converting from RGB at the end can cause colour shifts, particularly with vivid blues, greens and oranges — our CMYK versus RGB page explains why. -
What is bleed, and why does it matter for card printing?
Bleed is extra artwork that extends beyond the finished card edge. Cards are cut from larger sheets and the cutter has a small tolerance of 1–2mm. Without bleed you risk a white or unintended colour border appearing along the edge of your finished cards. The diagram above shows it, and there is more on our bleed and size page. -
What is a safe zone on a plastic card template?
The area at least 3mm inside the finished card edge, where all important content — text, logos, barcodes — should sit. On a CR80 card that leaves a live area of 80mm × 48mm. Content too close to the edge risks being trimmed off during cutting. -
Can I send a Word or Canva file for plastic card printing?
Not directly. Word and PowerPoint files cannot be used for print production. Canva files exported as high-resolution PDFs at 600dpi in CMYK can work, but quality varies. Contact us before sending if you are unsure — it is better to check upfront.
Send Us Your Artwork
Send the file over and we will check it against everything on this page before it goes anywhere near a press. If the bleed is missing, the resolution is short, or a colour is going to shift in conversion, you will hear it from us at the start rather than at proof stage.
Every full colour order gets a free photorealistic email proof. If you’d like to see how the artwork lands on real plastic first, add a postal proof for £65 +vat: a few cards printed on the production presses and posted to you before the full run. We typically reply to quote requests within 10 minutes during working hours.
Download our artwork templates, check font sizes and portrait or landscape, look up a term in our card printing glossary, browse the full range of card types, or read our guide to using AI to design your card artwork.